Crossing Paths

Crossing Paths
Model Melbourne trams
Showing posts with label infrastructure. Show all posts

Tuesday, 25 September 2018

The Sharing of knowledge and other distractions

Now that I have a bit of real estate to play with, and with the layout in the spare room, combined with all sorts of fun I get up to in the shed. I believe now that I may have it good. 

Now for some thing different..........(drum roll..........cymbal crash!!!)


Da Da Daah.....

A colleague of mine has shown interest in having something to run his reasonably contemporary collection of N scale British rollingstock on, but has little to no idea of how to go about it. 

He questioned me on how one goes through the process, the first thing I informed him of, is "that it is his railway, therefore his rules". 

The design brief consists of an oval of twin tracks with two crossovers, an elongated external branch line with passing loop, plus a few sidings all to fit on a 1400mm x 900mm baseboard that can be accommodated in the back of a smallish hatchback. 

After a recon out to the car park to measure up, along a quick sketch of a baseboard frame plan, then printing off several Peco point templates combined with a quick trip to the local big box hardware store for some timber. The concept has been conceived. 

This layout will be DCC with an option to run the odd and only one loco/consist on DC with a flick of a switch. DCC will be provided by the NCE Powercab. 

After the frame of the baseboard was completed and the roughing out of the DCC bus had been installed.  Then there was a pleasant Sunday spent in the shed laying track, sampling some party pies and beverages, listening to old school music along with the VFL grand final on the tv in the corner. Thanks for supervising Brendan


The track work/damage in the shed.

On the Monday, I tidied up some cv's and sorted out some addresses.


Then Glenno Go-Box now features a N scale programming track. 

But it's not all squinting with N scale, I did manage to 'massage' the bend module back into Victoria Street, as I believed that having the racecourse terminus straight after the gates looked somewhat pointless, as any sensible tramway operator would have terminated short of the railway and let the punters walk across the tracks. After this recent foray into N scale, Victoria Street now looks massive!

Order has been restored. 

I have also organised a pull out shelf for the decoder programming laptop and the Powercab that slides neatly into the cabinet under the gates module, thus improving my standing with the domestic authorities. win/win.


Now you see it.


Now you don't. 

Then on top of that I now believe that I have completed my collection of the Victorian Railways motive power that was on offer from Hornby era of the 1960-70's. Mass market modelling at its finest for us in the antipodes. This only happened because Victoria Street was in storage and I had nothing to do. 

You can almost smell the ozone from these  'old school' user serviceable models. 

From the eclectic collection above and beside the slightly extended wires. 

Glenn

Sunday, 24 June 2018

Resumption of services. As if!

Forgive me followers for it has been far too long between posts. 

There are many things to be said about relocation, you have a fair idea what to keep and what to discard, you also have a similar opinion about other stuff, and then you have to prove once again that you are not a hoarder. 

It is the eternal dispute of what needs to stay, and what has to go. 

At the moment, I feel like those certain blokes who attempted to impose their ideals across Western Europe. That is, if you take on more than one onerous task at one time, more than likely it's going to end in tears. 

The layout does reside indoors, while the workshop space is out the shed. 

I have relocated the layout, but!!!

It has seems that storage and time has been somewhat unkind to reliable running.  Also at the same time, the rollingstock has somehow suffered the same issue. 

I have cleaned the tracks, cleaned the wheels on rollingstock, and still, have encountered some serious issues with reliability. 

For some reason.....

The lights on the racecourse module will not work when connected to the rest of the layout, yet will work independently in test mode. 

The 'up' track from the racecourse terminus is as dead as a door nail, yet works again when tested independently.

Rollingstock, such as all of my W class have become so unreliable, that it seems all will have to be overhauled in regards to pick ups, lights and cv adjustments.  

I'm so despondent at the moment, I'm at the stage of completely dismantling and refurbishing the layout and the rollingstock in the newly created shed space so not to upset the domestic authorities. 

But enough of the negatives...

My first win is the display case that is mounted above the layout in the inside room. Made from repurposed Bestä cabinets that originally held our kids DVDs, a few doors and a few more shelves, this has turned out a winner. 

Behold the wonder....

An elegant dust free environment.


My Melbourne and regional Victorian collection.


 In the spare room shared with the brides sewing machines

Next win, 'The shed'/modelling space has come up a treat, with some of my family and colleagues commenting that I should have had this place about twenty years ago.

A place to tinker and think, and watch footy/races on the TV. 


Plus plenty of natural light.
To complete the trifecta, now with two play/work spaces, it has come to pass that I need to have another means of programming DCC rollingstock, enter the modifications to the 'Glenno Go-Box®', now featuring a NCE-PCP (Powercab control panel), this will now allow me a chance to tinker out in the shed with JMRI and gut rollingstock in attempt to make them run better. 


All fitted with a DPDT switch so I can feed the programming rails/rollers from either DC or DCC. 

This is the state of play so far, why is it that when one has moved from one place, there is now a need to make the new place resemble the previous place?

One of life's enduring mysteries. 

Back under the wires, from the other side of town. 

Glenn.


Sunday, 8 April 2018

A mutual understanding.

Yes it has been quite a while since the last post, we have moved into the bigger domicile and have progressed through most of our boxes of stuff. The kids have also settled in nicely. 

The 1960's tilt door garage was cleaned out, swept and dusted, while this was initially destined to become the new home for Victoria Street, the bride had another suggestion.........

Her idea is that the layout in its usual configuration could reside in the spare room the other side of our en-suite as just a running layout, while all the "untidy"(her words) works such as painting, modelling and soldering should take place in the shed, this inside space would significantly reduce the dust experienced in the shed and I can share the inside space with her sewing hobbies.  

While this offer is proving inviting, the reality is that the wall space allocated is long enough, the right hand side return that would feature the bend and racecourse modules would foul the doorway for the en-suite, and this will not do. 

So while these matters are in play, I'm in the process of re-configuring the modules into a cohesive narrative and a functional layout. 

The best scenario and easiest solution at the moment is to remove the bend module and have the racecourse module attach directly to the gates module as an 'old school' along the wall shelf layout. The bend module would reside in the cupboard for exhibitions or could be dragged outside for photography in sunlight. 

Another option is to position the bend module between the junction and railway station modules, this would require trams running out to Ammo factory to traverse the bend before shunting at the station cross over.  This would require the layout to have a return on the left hand wall of approximately four feet, with the rest of the layout along the allocated wall. I ran this configuration at the Sunshine model railway show in 2012, at that stage minus the junction and depot. This concept will need to be negotiated. 


Something like this. (Pre DCC)

And this, one huge retail strip. 

Hopefully to be under the wires soon. 

Glenn

Wednesday, 21 September 2016

There is always something on the go.

Since the exhibition, the layout sat fallow in the study for over a month, still as the three disjointed modules that were placed there on the Sunday evening after the exhibition.  This is mainly due to the bride entering the final furlong of her post graduate studies, which in turn places me in the chief role of kid wrangler (3), until Melbourne Cup week (early November). 

With the modules not connected, this allowed some housekeeping to be performed between organising food relief (dinner) and emergency sessions of the UN Security Council (peacekeeping).
- some street lights at the junction were finally connected. 
- an external socket and switch installed to the front end of railway station module.
- an introduction into the realm of Bluetooth technology. 

Lights are on.

The intersection of Victoria St and Albert Rd is now illuminated by street light which improves operational safety for tram services heading to and from the Ammo Factory of a night time.


The Junction at night


A lonely wait at the Ammo Factory

The Glenno Go-Box*.

The only place that I could set up the rolling road was the open ballasted track on the Ammo Factory Module, but now I have installed the trolley wire, I no longer have the height under the wire to use it there.

Enter the solution to the problem.... 

The Glenno Go-Box* by Glenno Innovations.

"Crafted from the finest left over commemorative port wine display box, The Glenno Go-Box* will last longer than the horrendous hangover from the original contents.
It's a rolling test track, it's a servicing cradle with storage all rolled into one, but wait! It's also portable, it can run DC, DCC and also has a battery option for when you are away from the work bench.

A rolling road for DCC programming....

A servicing cradle.....
    
 The Glenno Go-Box* is supplied with two directional 1/4" mono jacks, with 1/4" plug on each, a battery pack, a set of powered wheel cleaning tools and a fly lead that connects to your layout, regardless if it's DC of DCC.

Battery option....
 
The Glenno Go-Box* is great for running in new rollingstock and/or programming DCC, as it takes up little space, ideal for those with small or micro layouts.

  Small and compact with storage....

In service mode, it stores and sorts all your service equipment in one convenient compact location.

The Glenno Go-Box*"

In reality, I have cobbled together an old grog box with a bit of flexi track glued to the outside base, wired to a pair of mono jacks that can fed by a battery pack or a fly lead from the layout, that can also power a set of Peco wheel cleaning tools, all of which can be kept inside with the rolling road under a sliding lid fashioned from an old cutting mat (as the perspex lid was re purposed for switch panels).  I have installed felt pads on one side and blocks of rubber on the other so to keep the rails side clear of the bench when in service mode.

Note; this concept is not trademarked* or patented, so feel free to plagiarise this idea for the benefit of the entire model railway community.

A switch and a 1/4" mono jack has been installed on the railway station module so to feed the Glenno Go-box, the switch throws the power from the supply(DC or DCC) to either the track or the output so not to reprogram the rest of the fleet sitting on the rails, the lead was purchased from a music shop, as used by rock guitarists for effect pedals.

The feed from the layout.

Bluerail Bluetooth Decoder.

From cutting notches to cutting edge. I have recently installed a Bluerail Bluetooth unit into
one of my fleet, SW6 870 a Cooee collectable static model retro fitted with the mechanism from a Bachmann Brill trolley.

Direct control via Bluetooth and the free app.

Not much real estate left under the drop centre.

This adaptable chip plugs directly into a 9 pin decoder socket, while larger than regular and cheaper DCC decoders, this allows myself to use a smart phone directly to control this tram without having to fire up the laptop, run JMRI, make sure the wifi is up and the USB interface is plugged in if I wish to trundle a quick service from one end to the other, without either having to punch in the car number into the tethered Powercab, all I have to do is power up the rails with either DC or DCC, open up the app and we are off.

The size comparison.

All the adjustments are made from the smartphone, also it plays sounds out of the smartphone, as it only set up with diesel and steam loco sounds at the moment, I have muted the horn, engine noise and toned down the coupler clank to substitute for the linebreaker kicking in. Break squeal and release along with the bell provide enough entertainment for me at this stage.

Motor control is smooth, but it will not tolerate any slight disruption to power supply and will shut down, it is probably less tolerant than DCC, but this is all a learning curve at the moment. The Bluerail unit also has four light outputs that can be adjusted from the smartphone.

I have bought another one which I may adapt into an adhoc Bluetooth DC controller or use as a spare if I let out the magic smoke!

So there it is, a bumper issue, and as with all road trips there were some casualties.

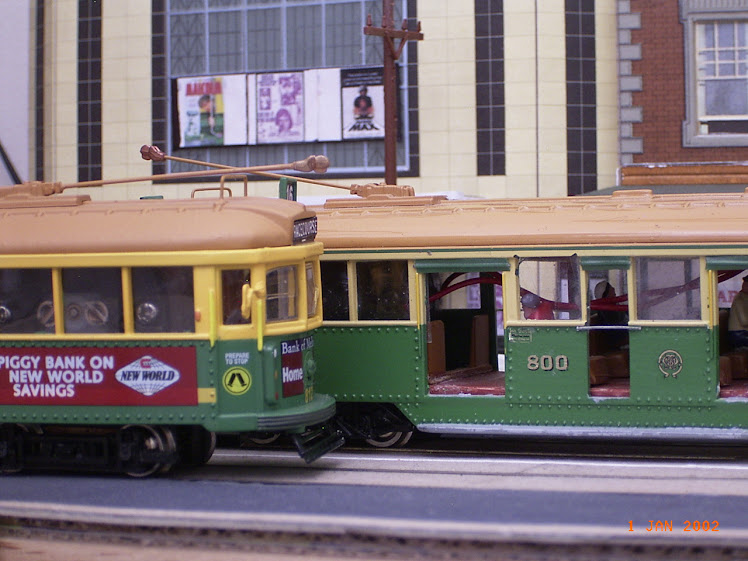
W5 800 looking worse for wear, minus a route number box and a lifeguard
residing at the Ammo Factory siding waiting for repairs.

Staring down into the football finals (Go Bulldogs!), then rolling straight into the spring racing carnival from under the wires.

Glenn


Wednesday, 13 July 2016

The wire is up!

Finally the trolley wire is up left of the railway bridge on Victoria Street. 

After about eighteen months since the beginning of construction of the new modules, (the depot, the junction and the Ammo factory), the trolley wire sits resplendent above the rails. 
Now to be quite honest, I thought I would not be able to get this up before the Sunshine model railway club exhibition, the first weekend of August; however the lucky combination of an early shift and and the bride heading off with the kids to her parents for a few days during the school holidays allowed myself to knock over this task. 

The method of hanging wire is a bit of a dark art that requires a little planning and a fair crack of patience. 

The materials that I use for this project are;
- coat hanger wire (span poles)
- multi strand copper earth cable
- craft beads (insulators)
- PVA and five minute epoxy glue
- a sharp felt tipped marker pen

A collection of hobby tools required are;
- a soldering iron and solder
- small side cutters
- a 300mm/12" steel rule
- a cutting mat
- a few spring loaded clothes pegs

Let the fun begin

Now in a perfect world, be it 1:1 or 4mm:1', all span poles would be evenly spaced around the curve, in reality street infrastructure such power (utility) poles, driveways and other obstacles. This is where it becomes interesting.......

The span poles are the first to go up, straight coat hunger wire cut to length with a dash of black paint on the bottom like the prototype. 
Some span poles are reworked Atlas telegraph poles with a cross arm removed and a few insulators knocked off to resemble the power (utility) poles that line the tram tracks of suburban Melbourne.  
The span poles are glued into blind holes drilled into the base board, these holes should be a snug fit for the poles. 

The next is the span wire made from the strands of the copper earth wire, the strands are 0.6mm (.024") thick. 
To straighten the strand, I roll the strand between the steel rule and the cutting mat. 
First cut the wire longer than the span being covered, one end is coiled two to three times around an off cut of coat hanger wire, then five of the small craft beads are threaded onto the wire and are left to slide along the wire at this stage. 
The coiled end is slid over the top of the span pole, pulled taught then coiled on the opposite pole across the tracks. Rinse and repeat.

The span wires at the Ammo Factory

On the curves along the tracks, pull off wires are required for the intermediate span wires so the trolley wire can be centred above the track. 
These are soldered to the span wires close to the span poles, care is required when soldering close to the plastic power poles. 

The intermediate span wires are threaded with the beads and soldered to the underside of the pull off wires, again the beads are left to slide for the time being, the spring loaded clothes pegs assist in holding the wires during soldering.

When all of the span wires are in place, finding where the trolley wire will sit is the next stage. 
I have for this task cobbled a wire centering tool made from a non powered Bachmann Brill trolley bogie, a blob of Blu-tak and a tooth pick.  Crude but effective way of finding then marking the contact point of the trolley wire to the span wire with the marker pen. 

The wire centering bogie
Stringing the trolley wire requires over estimating the length of the run, starting from one then methodically soldering the trolley to every span wire where marked, at this point  making sure that two of the beads are between the pole/pull off wire and the trolley wire. The aim is to have along the span wire, two beads, trolley wire,  one bead, trolley wire, two beads. The clothes pegs come very handy when hanging the trolley wire and the wire centering bogie can assist in pushing the trolley wire against the span wire for soldering. 

Positioning and fixing the beads (insulators) along the span wire requires the tram with the widest pan on its pantograph for clearance purposes.  One bead hard against the pole/pull off wire, the next is placed clear of the passing pantograph, these are glued into place with PVA glue, the one bead between the trolley wire is glued dead centre. 
Therefore in the odd chance of a new tram with a wider pantograph fouling the overhead, the beads can be relocated with a drop of water. 

Clearance testing.  

The positioning of the overhead frogs over the points at the depot, junction and terminus I followed the local but fast diminishing prototype of Melbourne. Trolleyville online also provide tips on hanging overhead wire and fixtures. As the whole overhead had to taper lower to the railway bridge, the whole assembly was set into place by sliding and adjusting the wire height along the span poles, once I was happy with the 'flow' of the wire I used five minute two part epoxy glue to fix the span wires to the span poles.

To finish off, a splash of black paint. 

Easing into the Ammo Factory line.


The view from the railway bridge.


Another angle of the tangle

From under the newly installed wires. 
Glenn

Monday, 4 April 2016

Works at the Depot.

The brickies have been in and the depot shed is starting to resemble something like a tram shed and less like a cool store, This is the largest and most intact structure on Victoria Street, it is also the final one.

 
A typical day on the tramways.

The brick sheet used is Superquik pasted onto the foam board with a glue sick, concrete lintels and bases are cereal box card,  the roof is in the process of being finished off with Wills corrugated iron.

The space between the shed and the office features the former substation that used to serve the depot and the line to the Racecourse and the Ammo factory,  The original rotary converter installed when the depot was isolated from the main system inside has been mothballed and the space is used by maintenance as a store. This was made up from leftovers from the Ammo Factory building, a Metcalfe Warehouse kit.

 
The substation/stores

Depot signage has either been scanned from books or sourced from the internet, resized in windows word then printed out on office paper.

Here are few more photos in and around the new depot shed.

 
4MPH in the yard.
 
 
Carring out from the sheds.
 
 
About to enter service.
 
 
Road 3 at the rear of the shed,
the entry/exit point of rolling stock for the layout
 
 
The whole depot lends itself to an inglenook shunting puzzle, which means that in order to run a tram from the back of the shed, one has to shuffle and shunt trams in and out and try not block the traffic out the front of the depot for any extended period of time. some trams are sent over the crossover to the Ammo Factory to hide for a few moments, others provide 'double shunts' at the depot entry, all in all fun and thinking all round.
 
Now for the fun part, the overhead.
 
From under the roof at the end of the layout.
Glenn.


Wednesday, 24 February 2016

We're havin' ourselves a barn raisin'

All good depots need a shed, a tram shed/car barn, somewhere to berth and then service rollingstock after a hard days work, and in the situation of Victoria Street, somewhere to hide rollingstock from the domestic curse of household dust.

 
The Depot shed with W5 800 on the kitchen bench
(The place where all good models are photographed)

After the construction of the depot light and overhead array, I have been trawling cyberspace for a suitable structure to 'plonk' over the frame, I have settled on a traditional 'saw tooth' design that will allow ambient light during the day but will 'light up' in the evening when trams are retiring for the day.

A simple construction made from 4mm foam board, this grand shed spans the three roads of the Albert Road/Westside Depot, the roads, numbering from 1 to 3, left to right.
This is enough to serve the requirements of this cross suburban line with a little more space for a few heritage units for weekend gunzel* excursions.

 
Hiding in the shed

At the rear of the shed, road three runs through to an external yard (loading ramp), this is the entry/exit point for rollingstock on the layout.

 
A shot from the rear door of road 3,
looking out onto Victoria Street

More details to be added, brick paper, roofing and so forth, but it is a tram shed.

From under the wires inside the shed,
Glenn.

*Gunzel ( noun, slang Australia especially Victoria): A person who pursues useless and pointless railway enthusiast activities. Verb (intransitive) to gunzel, to go gunzelling.
UK equivalents: gricer, anorak.
USA equivalents: foamer, foamite.

Sunday, 25 October 2015

This is how we roll.

Just a quick update, I have obtained a set of rolling road (DCC Concepts) for Victoria Street, this will allow myself to fine tune DCC equipped rolling stock and run in some of my recent/sticky DC trams.

This is because there isn't enough running space on the layout for my fleet to get a good gallop up before it finds itself at the other end, and as a point to point shelf layout there also not enough real estate for a complete loop for some "roundy, roundy" action.


'Mind the step'

With enough roller assemblies for six axels, I have the resources to give three, four wheelers a whirl at one time, also the set includes spacers for those who choose to operate in other gauges, now to get the good laptop off the bride so I can start dyno testing the DCC fleet with JMRI.


A closer look.

Eventually I will set up some track on a plinth with both HO and N scale, with a feed from the layout operated/isolated by a switch, for running in/ programming purposes, as the only place I can slot these rollers on the layout is on the open ballasted track at the Ammo factory module

Watching the wheels turn but not going anywhere,
Glenn.