Crossing Paths

Crossing Paths
Model Melbourne trams
Showing posts with label DCC. Show all posts

Monday, 12 November 2018

Now we have six

Not a lot has being going on of late, Spring has sprung in Melbourne and along with it comes a fair crack of garden work, especially now that I have this expansive green stuff called lawn that needs a regular hair cut so I don't lose the family Jack Russell amongst it.

Along with all this, the covered outdoor family area received a lick of paint, also I installed a watering system for the overhead plants that now reside in this space. The season also coincided with the AFL Grand Final, (Collingwood, the bride's team, lost to West Coast) that dovetailed into the spring racing carnival and the Melbourne Cup, which we enjoyed watching with family and friends in our newly reworked outdoor arena.

This was the long waited 'housewarming' that was needed since relocating in late February.

The N scale project has languished in the shed, but I did manage to chip my last W Class tram, this now makes it number six on the roster at Westside Depot, introducing SW6 964 MkII, my first 964 has been renumbered 907 with DCC but will be physically renumbered shortly.


Trams from Westside Depot
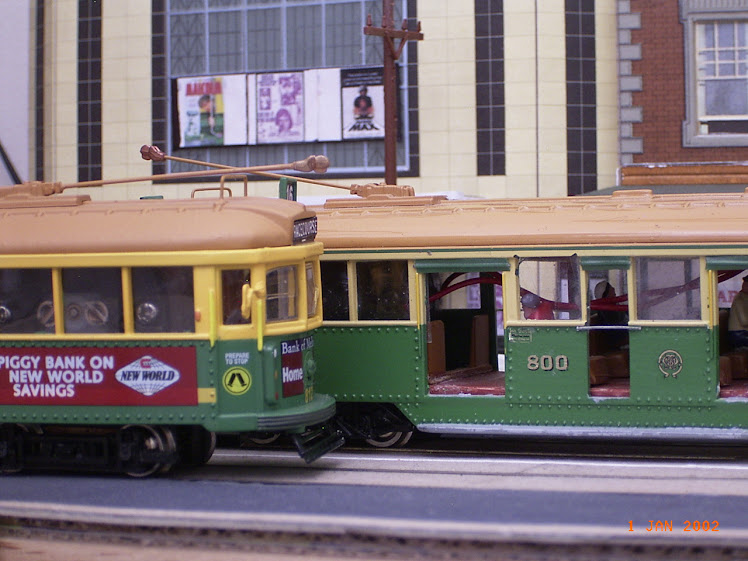
L-R 812, 821, 800, 907, 964 & 870

This was the tram I purchased just before the move, now it can play with its mates on the layout.

From a crowded Victoria Street under the wires,
Glenn


Sunday, 24 June 2018

Resumption of services. As if!

Forgive me followers for it has been far too long between posts. 

There are many things to be said about relocation, you have a fair idea what to keep and what to discard, you also have a similar opinion about other stuff, and then you have to prove once again that you are not a hoarder. 

It is the eternal dispute of what needs to stay, and what has to go. 

At the moment, I feel like those certain blokes who attempted to impose their ideals across Western Europe. That is, if you take on more than one onerous task at one time, more than likely it's going to end in tears. 

The layout does reside indoors, while the workshop space is out the shed. 

I have relocated the layout, but!!!

It has seems that storage and time has been somewhat unkind to reliable running.  Also at the same time, the rollingstock has somehow suffered the same issue. 

I have cleaned the tracks, cleaned the wheels on rollingstock, and still, have encountered some serious issues with reliability. 

For some reason.....

The lights on the racecourse module will not work when connected to the rest of the layout, yet will work independently in test mode. 

The 'up' track from the racecourse terminus is as dead as a door nail, yet works again when tested independently.

Rollingstock, such as all of my W class have become so unreliable, that it seems all will have to be overhauled in regards to pick ups, lights and cv adjustments.  

I'm so despondent at the moment, I'm at the stage of completely dismantling and refurbishing the layout and the rollingstock in the newly created shed space so not to upset the domestic authorities. 

But enough of the negatives...

My first win is the display case that is mounted above the layout in the inside room. Made from repurposed Bestä cabinets that originally held our kids DVDs, a few doors and a few more shelves, this has turned out a winner. 

Behold the wonder....

An elegant dust free environment.


My Melbourne and regional Victorian collection.


 In the spare room shared with the brides sewing machines

Next win, 'The shed'/modelling space has come up a treat, with some of my family and colleagues commenting that I should have had this place about twenty years ago.

A place to tinker and think, and watch footy/races on the TV. 


Plus plenty of natural light.
To complete the trifecta, now with two play/work spaces, it has come to pass that I need to have another means of programming DCC rollingstock, enter the modifications to the 'Glenno Go-Box®', now featuring a NCE-PCP (Powercab control panel), this will now allow me a chance to tinker out in the shed with JMRI and gut rollingstock in attempt to make them run better. 


All fitted with a DPDT switch so I can feed the programming rails/rollers from either DC or DCC. 

This is the state of play so far, why is it that when one has moved from one place, there is now a need to make the new place resemble the previous place?

One of life's enduring mysteries. 

Back under the wires, from the other side of town. 

Glenn.


Sunday, 29 January 2017

Rolling along

I cannot believe it's nearly four and half years ago that the empire expanded to five W class trams*, yet to have all in service at once has not yet really been achieved.


The family portrait from then.

A lot of decoders and exhibitions have trundled by, along with the extension to the running lines and an inclusion of a depot. After a summer break that did not engage the usual serious intervention*, the consideration once again looks to rollingstock.

The static W5 812 was roughly fitted with a rolling DC chassis at the time but was left like a wallflower on the shelf as the other W's were retro fitted with DCC and lights. This W5 812 was earmarked to be re-imagined as W5 795, but with a little research W5 821 was the only canvas two door W5 painted in the then new corporate green and gold of the metropolitan transit authority, this now saves me a paint job. It was also unsuccessfully fitted with trolley retrievers to the apron, another little detail to differentiate it from the rest. here is my work in progress.


Work in progress


The chassis (Bachmann Mech) with the NCE 13SRJ decoder fitted under the drop center.


W5 821 going for a trundle down Collins St in the City .

The decoder was appropriated from my SW6 870 (since fitted with Blu-rail chip) which also runs the retro fitted Bachmann mechanism that 821 operates.

As with most things, the more you adapt things, the more you learn to simplify the process. The time to prepare the LED sub assemblies with the correct wire colour, planning where to run the fibre optics for the marker lights and developing a simple method of connecting the lighting options to the decoder, all make it enjoyable.


LEDs at the ready.


Plug and play.
(Reworked 8 pin IC socket)

This foray into rollingstock is due to the fact that I believe that I have finished* the layout, as the only outstanding work required was to clad the last bay of the depot roof with corrugated iron, this has now been completed.


The depot is complete.


"We need a bigger shed"

From under the wires with the smell of hot solder.

Glenn.

*As if a layout is ever finished!

Wednesday, 17 August 2016

The Sunshine Report.


Another exhibition done and dusted, the Sunshine Model Railway Club by their reports had a reasonably good turn out over the weekend of the 6th & 7th of August, to myself it felt busy at times but not too crowded, with the punters easing off during the last hour or so on both days.


Plenty of natural light at Sunshine.

There were two main points of interest with the layout, trams as opposed to trains, and the use of wifi control with smartphones/tablets with  JMRI and DCC. 

The tram angle with the JMRI works as it allows tight head ways and independent operation with the ability to wander from one terminus to the other whilst in some form of control. 

The other great feedback was how detailed the layout is and also how given its compact size offered plenty of operational scope. 

The exhibition was another chance to catch up with a few familiar faces and  put faces to names on people who follow this blog. There was plenty of variety of layouts on show, ranging from Z scale to G scale live steam covering Australian, British, European and U.S. prototypes, along with the usual traders.

On the Sunday, I was assisted by my oldest daughter which eased the load of having something on the move while chatting with the public. 

As per usual, there were a few dramas, such as stalling, derailments and the odd bit of bang roading together with a complete shutdown of the JMRI when the eldest turned off the laptop, but these add character as well as a few more grey hairs. 

The other thing that dragging out the layout does is it gives you a chance to view it from different angles and from a distance.  The pack up was pretty swift, the exhibition closed at 4pm and the car was packed and the key in the ignition by 4:27 and was home by 4:45 after swinging by the bottle shop(off licence/liquor store).


Looking along Victoria St back to the Depot.

 
From the depot end.
A few photos from the weekend. 


There wouldn't be an exhibition without Lego these days.


Pondering what to do next from under the wires.

Glenn

Sunday, 6 March 2016

There is a fine line between detail and insane.

I have been in the process of installing lights into the two SEC trams, Ballarat 28 and Bendigo 29. These trams were DCC chipped nearly two years ago, they had their CVs tweaked and have been in regular service since.

 
County cousins from about 2 years ago.
 
However a tram without running lights can be a hazard to itself and to others, for when it is called up by the controller, you have no clear idea which direction it will go when it moves into step one, (usually into the tram 'behind' it at the depot), nor can you tell if it has stalled on dirty track or it's just being difficult.

That's the thinking behind about fitting lights are, the headlights let you know which way it should go and the saloon lights inform you that the tram is receiving power and is waiting for further instruction, this sums up the detail aspect.

The insane part of this blog, is that both trams are of the single truck four wheel variety, (Ballarat 28, a reworked tyco/mantua trolley and Bendigo 29 a JEM resin kit on an Bachmann 44t powered bogie) therefore there is a distinct lack of real estate inside these models, even when you have installed rather small decoders, there is the space consumed by the mechanism, then you decide to install headlights, marker lamps and interior saloon lights as well, enter the two blokes with the straight jacket and a few sessions of weaving cane baskets!

 
The mechanism of Bendigo 29, with a socket on top
fashioned from half an eight pin IC socket.
 
 
The innards of Bendigo 29.
With three LEDs at each end, two warm white, on red.
 
What makes this concept more interesting is that I install LEDs with dropping resistors for lighting, but as I choose not to incinerate surface mounted LEDs for these projects, no, I use the more robust 3mm LEDs, warm white for the headlamps, red for the tail/marker lamps and yellow for interior lighting.

With the marker lights, I use 1mm(.040") fibre optic thread/element that is heat shrunk to the LED, and to ensure that the 'magic smoke' does not exit the decoder, all leads of components and wires are heat shrunk and insulated. All of which is in the confined space of these trams.

 
The marker light assembly, a warm white LED with heat shrink
surrounding the two smaller heat shrunk sleaves that the 1mm Fibre optic
element will press fit into.
 
 
Testing the marker light assembly before installation.
 
Ballarat 28 was just as entertaining to do, and was fitted out in a similar way. The results speak for themselves
 
 
Ballarat 28 & Bendigo 29 passing outside the Grand Theatre,
 
 
and earlier in the evening along Victoria St.
 
 
Then back at the Depot later that night.
 
 
From under the wires with little trams in the dark.
Glenn

P.S. This is the 100th post of Victoria Street.


Sunday, 11 January 2015

Plotting the reverse curves..

As stated in the previous post, the planning for the extension of Victoria Street is now a work in progress. The issue is that I have some domestic obligations to abide by in regards to the extension, that is that the study/man cave has a boundary line, that I dare do not cross, as not to invoke the full force of the domestic authorities.

The reverse curves that I have planned for the extension are an example of the town planning that occurs when former Melbourne municipalities employed either different and/or incompetent surveyors to plot aligning streets/roads from one subdivision to another.

There are still to this day plenty of reverse curves of the Melbourne tramway system that obviously traverse within the boundaries of the former municipal authorities, these roads and the real estate were plotted and sub divided when small suburban councils were operated like personal fiefdoms. The tramways came along later, and had to fit the alignment.

Classic examples of these are the route 1 to East Coburg, that cranks from right to left from Lygon St  across and along a short section of Albion St into Holmes St, in East Brunswick.

Another less extreme example is the route 12 to St Kilda/Fitzroy & Park Streets, this deviates from Danks St across Mc Gregor St, to Patterson St, in Middle Park ( the eastern edge of the former City of South Melbourne).

My example, as plotted, forecast and basically dreamt up, is so far according to clearance testing seems to be a working proposition.

The two ends of the layout were plotted, (the railway station and the fiddle yard/new ammo factory) across the available space left in the study and the potential bench/layout area.


The faint pencil lines show the extent of the chicane
module, the ammo factory module to the lower left, the
railway station module to the top right, the three way point
leads into the (future) depot. A Peco set track point has been
plotted to feed the depot three way point.(all going well?)
 

The Ammo Factory/fiddle yard module will have another
commercial Y point fitted for the siding. I have done away
with building a single blade point for reliability.


The pencil lines show the overhang of the running boards,
as these are my longest/widest bogie trams, all others do fit inside the envelope.
 
 
There is enough room for everyone.
 
 
Enjoying taking things further than pencil and paper from under the wires,
 
Glenn.


Wednesday, 17 December 2014

'Open Sesame'.........'creak, groan, clank'

Yes, I have done it! I have finally animated the crossing gates of Victoria Street. Another item has been ticked off the bucket list.

 
The finished product.
 
 
The gates are operated by a Tam Valley DCC servo decoder, the crossing lights are controlled by a six function decoder. The four crossing lights are LEDs mounted on the shafts of plastic provided by cotton buds, each LED has its own light feature, two are alternating strobe, one the Mars light function and the other the rotating beacon. This provides the prototypical mismatched sequence of rotating beacons that were installed at these crossings.
 
 Also the tram signals are operational, with a fibre optic thread running from LEDs using the other two functions (headlights). A LED is mounted on the facia in parallel of the tram signal to show its status.
 
An OFF/ON switch is fitted between the DCC bus and the servo decoder, plus the six function decoder in so to isolate the set up when running 'antique' DC rollingstock. 


Another dodgy video, but it works.
 
 
Then from above.
 
 
From under the wires with a smirk of satisfaction.
Glenn

Tuesday, 2 December 2014

More on the Gates

Now the fun part of installing the mechanism/control for the gates to the module. Holes were drilled at the base of the pivot points of the base board when the module was built, in the hope at the time.

The servos are fitted on Brunel Hobby servo mounts in a way not envisaged by the designer, the servo is mounted upside and with the inner side of the mount missing to allow the sweep action of the servo crank. The pivot pin is made from copper wire soldered to a copper wire 'staple' that that is hot glued to the crank, the pins of the 'staple' lines up with the holes of the crank, and the pivot wire lines up with the centreline of the servo shaft. A clearance hole was drilled in each of the servo mounts for the pivot wire to protrude through.

 
One of the four servo assemblies.
 
 
The crossing gates are readily available, made by Peco, while British in origin, they have been kitbashed and details added to make them more like the older style gates that dotted the railway network prior to the more contemporary boom gates. These were drilled out with a pin vice with a 1mm drill bit, along the centre line of the hinge pin.


The pivot pin through the gate post hinge.
(The copper wire will 'give' in the event of impact,
the post is pressed fitted onto its base)
 

Before with the crossing lights.


Work in progress
(the servos are pinned with thumbtacks until final positioning)
 
 
The front of the module will be replaced with a perpex window so to keep an eye of the inner workings.
 
From under the road, under the wires.
Glenn


Sunday, 16 November 2014

"Open up the gates!"

One of my many projects on this layout was to somehow animate the gates of the crossing square of Victoria Street, I do now believe that I am a step closer to fulfilment.

I have glanced over the possibility of using servo motors in the past, but had no real idea how to make it all happen, today I stumbled across the dark arts of Tam Valley Depot being offered by Brunel Hobbies at the Croydon Model Railway exhibition.

After parting with/investing some cash, I came home with a servo decoder and four servos, in the process of cooking the Sunday roast, I nutted out the how to put it together, then program this collection of components, and made it work as a proof of concept.

Some happy snaps...
 
 Blu Tak is a wonderful product.
 
 
The entertaining part will be fitting it under the module
and making it work.
 
Behold the wonder of technology.............(and dodgy video)


some tweaking will be required, but that's where the fun is.
 
 
From under the wires with a new way to spend money.
 
Glenn

Sunday, 17 August 2014

The Sunday shakedown and a photobomb.

In preparation for the Caulfield Exhibition, testing is currently underway. So far so good, the DCC wiring bus is working, the lighting is working, and most trams are behaving.

Most of the issues are related to details, decals and advertisements, plus some scenic items.

The JMRI and decoderpro passed with flying colours, the spare wifi router did its job, and every device was employed to have a crack at driving.

 
Seven trams on the go, from the left, two on the powercab, one each on the apple devices,
then three on the android smart phone, plus the USB interface on the right, complete madness!


shakedown Sunday, (this will be more presentable next weekend)


then Sparky decided to drop in and act as starter/inspector, he will
be at home in his cage next weekend, (he is currently going through
 that awkward teenage destructive phase and learning bad language)
 
 
From under the wires and close to the exhibition.
Glenn.

Tuesday, 5 August 2014

Weekend of Birneys

 
I recently picked up a DCC ready Bachmann Birney tram off Ebay, plonked it on the rails, fired up the decoder pro and started tweaking the CV, that's right the CV, as this is fitted with a rather basic decoder, it lacks the finesse of speed tables, kick rate/depth and lighting options that I have been accustomed to. The Birney goes well, a little too well and needs to be reigned in, this will get another decoder.
The recent purchase.

Eventually this Birney will undergo some modification to left hand drive, a splash of green(or brown) and cream paint and gold decals with black shadows thus becoming X 217. This will be my second X 217 after a repaint of a right hand drive Walters white metal Birney (that surely was made from depleted uranium given its weight!) This will not be DCC chipped and will live out its days in the display cabinet, with an occasional run on the DC optioned Victoria Street.

The first X1 217 (with arse about doors)
 
 
Now whether to go green or brown????


One pole or two....

From under the wires with a rather small tram.
Glenn

P.S. the countdown to Caulfield continues........